How to Create HTML Files (Web Pages) with VSCode
Kickstart Your Career: Frontend Development for Absolute Beginners! | Lesson 2

Transcript
Welcome back to "Kickstart Your Career: Frontend Development for Absolute Beginners"! In this lesson, we're going to dive into the very basics of HTML by creating your first HTML file. We will even learn a little bit about your first HTML Element: the Paragraph!
What is HTML?
HTML, which stands for HyperText Markup Language, is the foundation of every web page. It provides the structure and content of a webpage by using a system of tags and elements. In the following lessons, we will explore these concepts more fully, but for now, let's just create your first HTML file and have some fun!
Getting Started
To begin, open your text editor or IDE. If you followed our previous lesson and installed Visual Studio Code (VSCode), open it up now.
Creating Your HTML File
- Open a new file in your text editor.
- Save the file with the extension ".html". You can name it anything, but for now, stick with
index.html. More information about why is coming in later lessons. - Inside your HTML file, type the following:
<!DOCTYPE html>
<html lang="en">
<head>
    <meta charset="UTF-8">
    <meta name="viewport" content="width=device-width, initial-scale=1.0">
    <title>My First HTML File</title>
</head>
<body>

    <p>This is my first paragraph in HTML!</p>

</body>
</html>
Your first lines of HTML code!
- Don't forget to save your changes once you are done.
Viewing Your New Webpage!
Now that you have an index.html file, you can use your favorite web browser to open and view it. Locate the file on your filesystem and double click it. If prompted for what application you would like to use, select your web browser. You should now see something similar to the following:
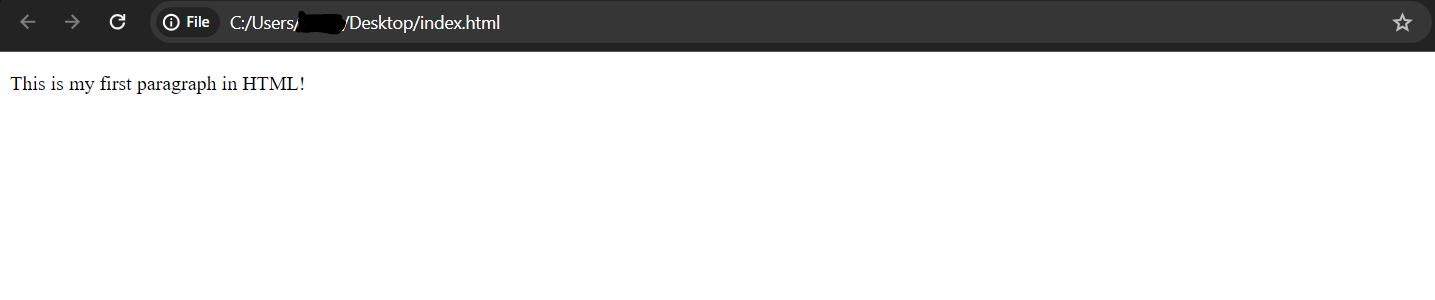
Congratulations on creating your very first web page! Now, let's change what the Paragraph tag displays.
Editing the Paragraph Tag
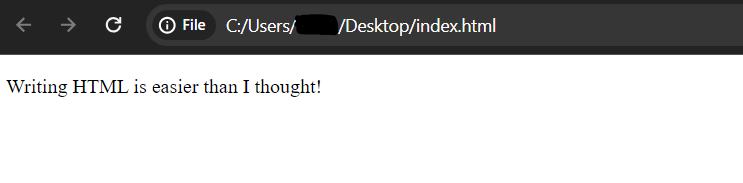
In future lessons, we will learn more about HTML Elements and Tags, but for now just know that your web page has a Paragraph element within it thanks to those <p> and </p> tags. Locate the This is my first paragraph in HTML! text contained within those tags and change it to say anything you want. Save the file, double click it again to open it in your web browser, and note how the web page has updated.
Adding More Paragraphs
To add more Paragraph elements to your web page. Simply type out another line of code following this pattern, where This is my second paragraph can be replaced with anything you want to say:
<p>This is my second paragraph</p>You should place the new line of code directly on a new line under the current <p> element. After you add the second Paragraph element, your index.html code should look something like this:
<!DOCTYPE html>
<html lang="en">
	<head>
		<meta charset="UTF-8" />
		<meta name="viewport" content="width=device-width, initial-scale=1.0" />
		<title>My First HTML File</title>
	</head>
	<body>
		<p>Writing HTML is easier than I thought!</p>
		<p>This is my second paragraph</p>
	</body>
</html>
Wrapping Up
Let's recap what we learned in this lesson.
- How to create
.htmlfiles (web pages) in VSCode - How to view
.htmlfiles locally in our web browser - How to edit existing Paragraph elements in HTML
- How to create additional Paragraph elements in HTML
In the next lesson, we will take a deeper dive into the concepts of Elements and Tags in HTML.
See you there!